
Struggling with a UPC issue on Amazon and not sure how to fix it? This step-by-step guide explains the right way to change a UPC code on Amazon without putting your listings at risk.
A UPC (Universal Product Code) is a vital identifier that links your item to Amazon’s catalog. Getting your UPC from a reliable source like GS1 is critical, but sometimes you’ll find yourself needing to update or replace it. Unfortunately, Amazon doesn’t make the process simple.
Although it is possible to change UPCs, the procedure is often confusing due to Amazon’s strict rules and system limitations. Many sellers avoid it because of potential listing errors, but doing so can harm sales.
To help sellers, SAECOM FBA PRO created this straightforward guide. You’ll learn how to update UPCs properly, what to do if your request is rejected, and expert tips to improve approval chances.
Can You Change UPC Codes on Amazon?
Yes, sellers can change UPC codes on Amazon, but it’s rarely straightforward. Because UPCs are permanent identifiers in Amazon’s catalog, any request for changes is reviewed carefully.
Amazon sees UPCs as core product data. Incorrect changes can cause ASIN mismatches, listing suppression, or even warnings against your seller account. That’s why it’s crucial to follow Amazon’s rules step by step.
How to Change UPC Codes on Amazon?
There are several methods to update UPCs on Amazon, depending on your account level and situation. Below are the most effective approaches to help you make changes without jeopardizing your listings optimization.
Method 1: Update UPC Directly in Seller Central
If the UPC error happened when you created the listing, you may be able to fix it directly in Seller Central:
- Log in to Seller Central and go to Manage All Inventory.
- Find the product, click Edit Listing.
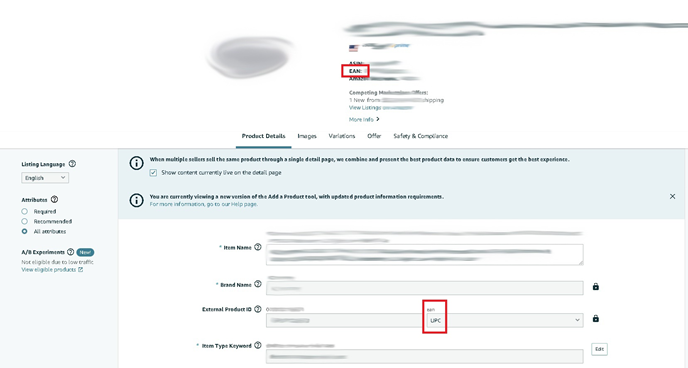
- Open the Product Details tab.
- Update the External Product ID field with the correct UPC.
- Save your changes.
This is the simplest option—if Amazon allows it for your listing.
Method 2: Submit a Case with Seller Support
If direct editing isn’t possible, your next option is to open a Seller Support case.
- In Seller Central, click Get Help and Resources.
- Select Manage Inventory or Product Details.
- Clearly describe your request and include:
- ASIN or SKU
- Incorrect UPC
- Correct UPC
- Reason for the change (e.g., wrong code used initially, now replacing with GS1-verified code)
- GS1 certificate or supporting documents
- Submit and wait for Amazon’s response.
Always attach documentation to strengthen your case.
Method 3: Create a New ASIN and Merge Listings
If Amazon rejects your update repeatedly, you may need to create a new ASIN with the correct UPC and request a merge.
To create a new ASIN:
- Go to Add a Product.
- Select I’m adding a product not sold on Amazon.
- Enter the correct product details, including the GS1 UPC.
- Save the new listing.
To merge with the old ASIN:
- Open Manage All Inventory.
- Select the incorrect ASIN.
- Use the Merge duplicate product option.
- Enter the new ASIN (target) and old ASIN (source).
- Provide a short explanation and submit.
This way, your reviews and history can remain intact, though approval isn’t guaranteed.
What If Amazon Rejects Your UPC Update?
It’s common for Amazon to decline UPC change requests. If that happens, here’s how you can handle it:
- Check the reason: Review the notification to identify whether it’s due to GS1 mismatches, duplicate listings, or invalid IDs.
- Write a professional appeal: Keep it short, polite, and solution-focused.
- Attach documentation: Include GS1 certificates, invoices, or product packaging photos.
- Use Brand Registry support: If your brand is enrolled, open a case through the registry dashboard for faster help.
- Contact the Page Fix Team: If third-party sellers caused incorrect GTIN data, this team can assist.
- Avoid spamming cases: Wait 24–48 hours for responses before sending follow-ups.
- Last resort: Delete and recreate the listing with the correct UPC if nothing else works.
Tips for Successfully Changing UPC Codes on Amazon
- Always double-check your UPC accuracy before requesting changes.
- Use GS1-certified UPCs only—Amazon may reject third-party codes.
- Schedule changes during low-inventory periods to minimize risks.
- Update listings individually to reduce bulk errors.
- Track your inventory and sales after the update.
- Maintain a paper trail with GS1 certificates and case logs.
- Stay current on Amazon policy changes.
- Be polite but persistent when working with Seller Support.
If you find the process too overwhelming, SAECOM FBA PRO can handle the heavy lifting. Their experts deal with listing corrections daily and know the exact steps to get Amazon approvals faster.
Final Thoughts
At some point, every Amazon seller may need to change a UPC—whether because of catalog errors, rebranding, or packaging updates. The process can be frustrating, but following the correct methods ensures you protect your sales and listings.
By staying organized, using GS1-certified codes, and appealing professionally when needed, you’ll improve your chances of success.
Need expert help fixing UPC issues on Amazon? Contact SAECOM FBA PRO and let their specialists update your listings quickly and correctly.